The very first step is to create your own theme which happens by creating an exact copy of the existing theme.
Why is it necessary?
After the above mentioned changes we can check how the Category1 icon looks like in our konwledgebase (customer portal) page after we reload the page:
Why is it necessary?
Because during each update of LiveAgent the default theme files are overwritten.
Creating your own theme
WARNING: This customization is only possible for standalone installations of LiveAgent.
If you should ever want to migrate to our cloud these customizations would be lost.
Instead try to customize using the default options for adding custom header, footer and CSS to the knowledgebase.
NOTE: In LiveAgent versions older than 4.7.2.1 (so versions prior to 4.2.7.1) the 'themes' folder was placed in /accounts/default1/ directory.
1) Go to the following folder in your installation of Live Agent:
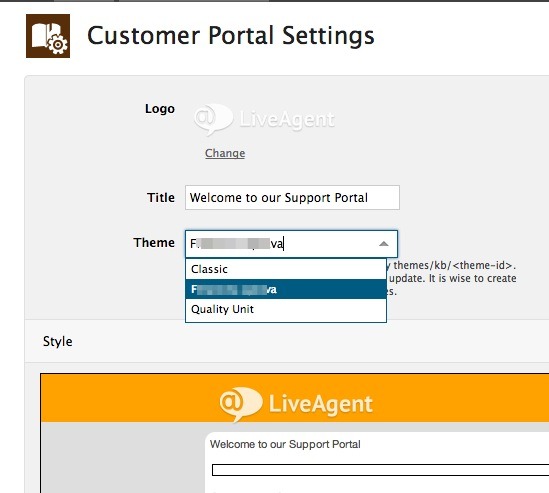
2) Navigate in the agent panel of LiveAgent to Configuration > Customer portal > Settings and there you will see a new list-box labeled as "Themes".
Let's say we wish to edit the icon of Category1 and Category2.
/themes/kb/
and there you will see a theme named "classic". Simply create a copy of it and name that copy whatever you want,e.g. "my_own_theme".
In the copy of the theme (e.g. "my_own_theme") folder open the 'theme.php' file and rewrite:
name=Classic
to e.g.:
name=Copy of Classic
2) Navigate in the agent panel of LiveAgent to Configuration > Customer portal > Settings and there you will see a new list-box labeled as "Themes".
From that list-box you can choose your custom theme.
NOTE: In versions prior to 4.7.2.1 you have to go to the "scripts" folder in of your installation of Live Agent and create a "custom.php" file there, while into that file you are supposed to place the following code:
<?php
define ('KB_THEME','name_of_your_custom_theme');
?>
After the above mentioned step is accomplished, navigate to /accounts/default1/cache/templates/ and delete the "kb" directory there.
From this time on your custom Knowledgebase theme is in use.
From this time on your custom Knowledgebase theme is in use.
Changing icons of some category
It is necessary to realize and keep in mind, that each category has its own css class id and we will have to find the proper class id and use it in the 'theme.css' file that can be found inside our theme directory.
Let's take a look at a default layout of knowledgebase:
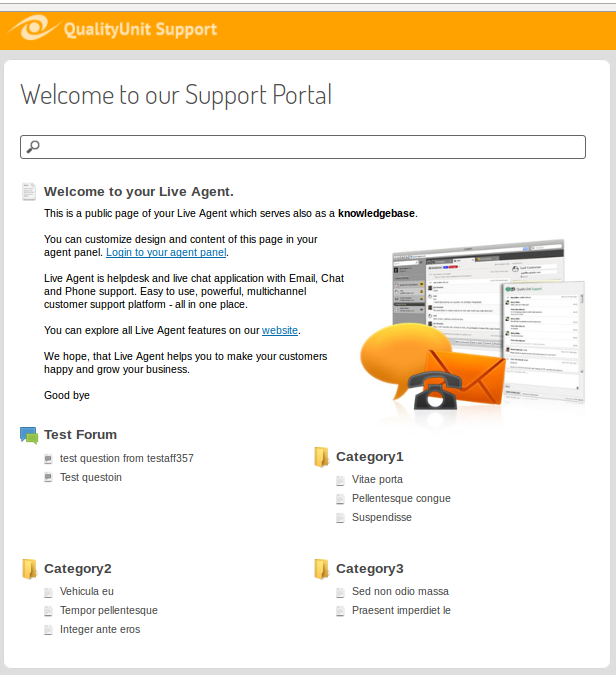
Let's take a look at a default layout of knowledgebase:
Let's say we wish to edit the icon of Category1 and Category2.
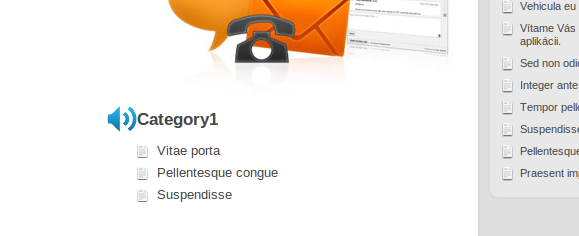
Changing icon of Category1
In our example we will use Google Chrome and its built-in developer tools. The ones who prefer Mozilla Firefox to Google Chrome may use the "Firebug" extension of Mozilla Firefox.Using Google Chrome right-click "Category1" and choose "Inspect Element". You will see a similar screen like this one:

I admit that there are pretty much css classes, but we will need only 3 of them - see them highlighted in the screenshot above.
So we will use CategoryBox9 , CategoryTitleBox and BigIcon classes in the theme.css file that can be found at
/themes/kb/name_of_our_custom_theme/
But before we go there, we should upload some images that we wish to use as our new icons into the "img" directory of our custom theme:
/themes/kb/name_of_our_custom_theme/img/
Optimal image size for a category icon is 28x28 px , while you can use either .png or .jpg or .gif file types.
/themes/kb/name_of_our_custom_theme/img/
Optimal image size for a category icon is 28x28 px , while you can use either .png or .jpg or .gif file types.
Now, let's open the theme.css file and add the following to the very beginning of it:
.CategoryBox9 .CategoryTitleBox .BigIcon {background:url('[$imgPath]name_of_our_image_file.png') no-repeat;}
where [$imgPath] stands for the path leading to the "img" directory of our custom theme. This way Live Agent knows, that it should look up our image file in the "img" directory of our custom theme.
The "no-repeat" property is essential, otherwise our image would be repeated in X axes (from left to right).
The "no-repeat" property is essential, otherwise our image would be repeated in X axes (from left to right).
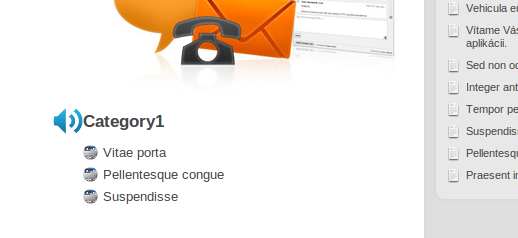
After the above mentioned changes we can check how the Category1 icon looks like in our konwledgebase (customer portal) page after we reload the page:
Changing icon of Category2
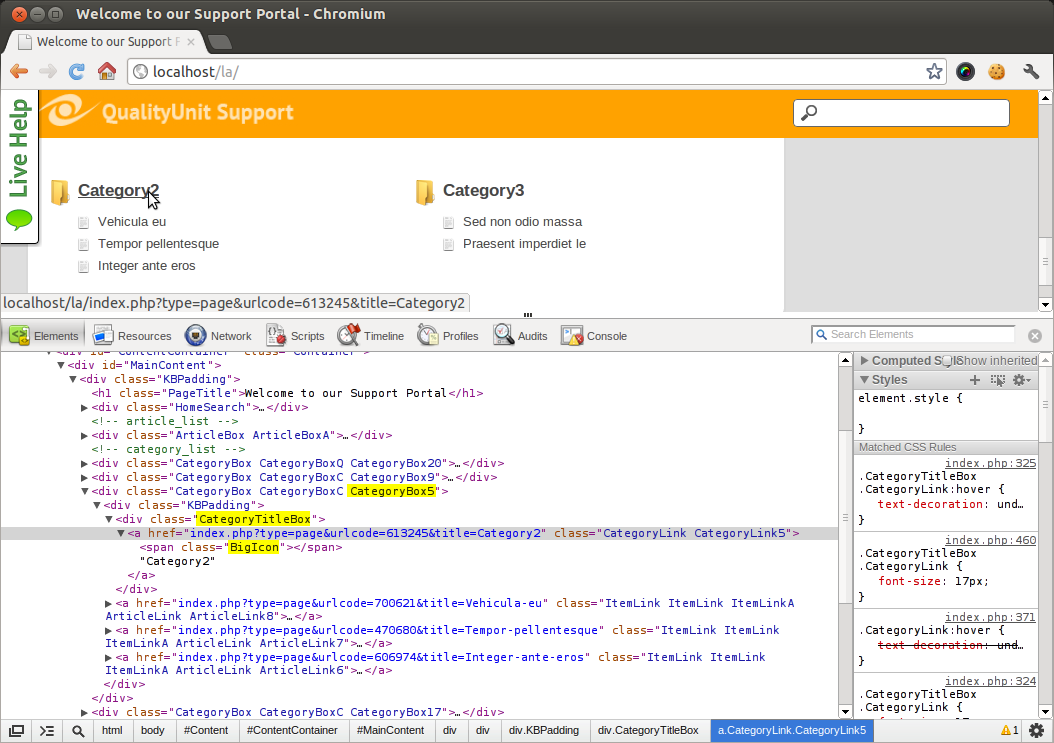
Using Google Chrome right-click "Category2" and choose "Inspect Element".
As highlighted in the screenshot above, we will use CategoryBox5 , CategoryTitleBox and BigIcon classes in the theme.css file that can be found at
/themes/kb/name_of_our_custom_theme/
Let's place there the following code:
.CategoryBox5 .CategoryTitleBox .BigIcon {background:url('[$imgPath]name_of_our_image_file.png') no-repeat;}
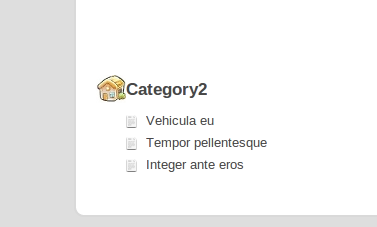
Let's check how it acts in the knowledgebase page:
What if we want to change also the icons of articles of a Category
The procedure is the same, only the css class is different.
Let's right-click one of the articles in Category1 and select "Inspect element":

Let's right-click one of the articles in Category1 and select "Inspect element":
As highlighted in the screenshot above, we will use CategoryBox9 , ItemLink and SmallIcon classes in the theme.css file that can be found at
/themes/kb/name_of_our_custom_theme/
So the proper code going to the theme.css file will be:
.CategoryBox9 .ItemLink .SmallIcon {background:url('[$imgPath]name_of_our_image_file.png') no-repeat;}
After accomplishing the changes we can check the knowledgebase page:
Optimal image size for article icon is 15x15 px